What is Memgraph
Memgraph is an in-memory, open-source graph database. It uses openCypher as its query language and is compatible with the Bolt protocol, which means any tool that works with Neo4j can connect to Memgraph without changes.
The key difference: Memgraph runs everything in RAM. This makes it significantly faster than Neo4j for graph queries, especially in scenarios where you need immediate results — like during incident response.
Why Memgraph for DFIR
- Speed: in-memory execution means queries return in milliseconds even on large graphs
- Lightweight: no JVM required — minimal resource footprint compared to Neo4j
- Instant deployment: a single Docker command gives you the full environment
- Open source: no licenses, no node limits, no surprises
- Bolt compatible: the same libraries and connectors you use with Neo4j work directly
When you’re in the middle of an incident and need to spin up a visualization environment fast, Memgraph removes all the friction.
Installing Memgraph
| Platform | Installation |
|---|---|
| Windows | Via Docker (see Windows prerequisites below) |
| Linux | sudo apt install memgraph or download the .deb/.rpm package from memgraph.com/download. Start with sudo systemctl start memgraph |
| macOS | docker compose (same approach as Windows/Docker) |
Once Docker is running, install Memgraph with:
iwr https://windows.memgraph.com | iex
This downloads a docker-compose.yml and starts two containers automatically:
| Container | Image | Port | Purpose |
|---|---|---|---|
memgraph |
memgraph/memgraph-mage |
7687 (Bolt), 7444 (logs) | Graph database engine + MAGE algorithms |
lab |
memgraph/lab |
3000 | Web interface (Memgraph Lab) |
Open http://localhost:3000 in your browser, click “Connect now”, and Memgraph Lab is ready. No database creation, no project setup — Memgraph is schemaless and accepts data immediately.
Windows prerequisites: WSL 2 + Docker
On Windows, Memgraph runs inside a Docker container, and Docker Desktop requires WSL 2 (Windows Subsystem for Linux). The dependency chain is:
WSL 2 → Docker Desktop → Memgraph container
Step 1: Enable WSL 2
Open PowerShell as Administrator and run:
dism.exe /online /enable-feature /featurename:Microsoft-Windows-Subsystem-Linux /all /norestart
dism.exe /online /enable-feature /featurename:VirtualMachinePlatform /all /norestart
Restart your PC after both commands complete.
After restarting, open PowerShell as Administrator again:
wsl --update
wsl --set-default-version 2
wsl --install
This installs Ubuntu by default. You will be asked to create a Unix username and password.
Step 2: Install Docker Desktop
- Download Docker Desktop from docker.com/products/docker-desktop
- Run the installer — make sure “Use WSL 2 instead of Hyper-V” is selected
- Restart your PC if prompted
- Launch Docker Desktop — confirm “Engine running” appears in green at the bottom left
Step 3: Install and run Memgraph
With Docker Desktop running, open PowerShell and execute:
iwr https://windows.memgraph.com | iex
This downloads a docker-compose.yml and starts two containers: the Memgraph database (memgraph/memgraph-mage) and the web interface (memgraph/lab).
Open http://localhost:3000, click “Connect now”, and Memgraph Lab is ready.
Troubleshooting WSL / Docker
**WSL service not found** (`ERROR_SERVICE_DOES_NOT_EXIST` when running `wsl --status`): ensure the Windows features from Step 1 are enabled and you have restarted your PC. If the error persists, register the service manually: ```powershell sc.exe create WslService binPath= 'C:\Program Files\WSL\wslservice.exe' start= auto sc.exe start WslService wsl --install ``` **wsl --update fails** ("The older version cannot be removed"): a previous WSL installation left a corrupted entry. Remove it first, then reinstall: ```powershell winget uninstall "Windows Subsystem for Linux" wsl --install ``` **Verify everything works:** ```powershell wsl --status # WSL is working docker --version # Docker is installed docker run hello-world # Docker engine is running docker ps # Memgraph container is up ```Loading data with masstin
The command to load the timeline into Memgraph is load-memgraph (not load-neo4j):
masstin -a load-memgraph -f timeline.csv --database localhost:7687
By default, Memgraph has no authentication enabled. If you’ve configured credentials on your instance, use the corresponding parameters. But for a quick analysis deployment, the default configuration is all you need.
Masstin preserves original values from the evidence. Node names and properties are stored without transformation. Only relationship types (user accounts) are normalized to valid Cypher identifiers (uppercase, underscores, @domain stripped, any non-alphanumeric character replaced — including the trailing $ of machine accounts). See the Neo4j article for details.
Two loading modes: grouped vs ungrouped
The loader has two modes that answer different questions:
Grouped (default) produces one edge per unique (destination, user, logon_type) combination, with a count property showing how many events collapsed into it and time set to the earliest. This is the global picture — who talks to whom, how often, and via which logon type. Perfect for understanding the network topology, mapping trust boundaries, and presenting findings to stakeholders.
Ungrouped (--ungrouped) produces one edge per CSV row, preserving the real timestamp of every event. This is the mode for temporal path hunting — finding chronologically coherent attacker routes where each hop happened after the previous one. Always scope it with --start-time / --end-time; loading a full 250k-row timeline ungrouped will create an unusable graph.
| Mode | Use case | Edges |
|---|---|---|
| Grouped (default) | Global overview, topology, presentations | ~100-200 |
--ungrouped + time window |
Temporal path hunting, incident timeline | 1 per event |
Loader flags
| Flag | What it does |
|---|---|
--ungrouped |
One edge per CSV row. Preserves real timestamps for temporal path queries. |
--start-time "YYYY-MM-DD HH:MM:SS" |
Drop rows earlier than this before building the graph. |
--end-time "YYYY-MM-DD HH:MM:SS" |
Drop rows later than this. |
# Global overview (default) — who talks to whom
masstin -a load-memgraph -f timeline.csv --database localhost:7687

# Temporal hunting — every event in a 30-minute window
masstin -a load-memgraph -f timeline.csv --database localhost:7687 \
        --ungrouped --start-time "2026-03-15 14:00:00" --end-time "2026-03-15 14:30:00"
IP and hostname unification
The same physical host often appears in different events as either an IP or a hostname. Both loaders build an internal frequency map and resolve them to a single graph node automatically. Events 4778 (Session Reconnected) and 4779 (Session Disconnected) carry an x1000 weight in that map because Windows always populates both the workstation name and the IP reliably for those events — so a single 4778/4779 outweighs hundreds of conflicting normal events. External attacker IPs that have no matching session simply stay as IP nodes.
If after loading you still see duplicates, see the merge-memgraph-nodes action at the end of this article.
Differences from Neo4j
While Memgraph is openCypher compatible, there are a few differences you need to know:
Timestamps
Memgraph uses localDateTime() instead of datetime() for timestamps:
-- Neo4j
WHERE datetime(r.time) >= datetime("2026-03-12T00:00:00.000000000Z")

-- Memgraph
WHERE localDateTime(r.time) >= localDateTime("2026-03-12T00:00:00")
Shortest path
The syntax changes. Instead of shortestPath(), Memgraph uses BFS notation on the relationship:
-- Neo4j
MATCH path = shortestPath((a:host {name:'WS_HR02'})-[*]->(b:host {name:'SRV_BACKUP'}))
RETURN path

-- Memgraph
MATCH path = (a:host {name:'WS_HR02'})-[*BFS]->(b:host {name:'SRV_BACKUP'})
RETURN path
Persistence
This is the most important point: Memgraph is in-memory. If you restart the Docker container, the data is gone. For a one-off analysis during an incident this isn’t a problem — you load, analyze, and move on. If you need persistence, you can configure snapshots in Memgraph, but for most DFIR use cases it’s not necessary.
Cypher Queries
The queries are virtually the same as Neo4j, replacing datetime() with localDateTime(). Here are the most useful ones:
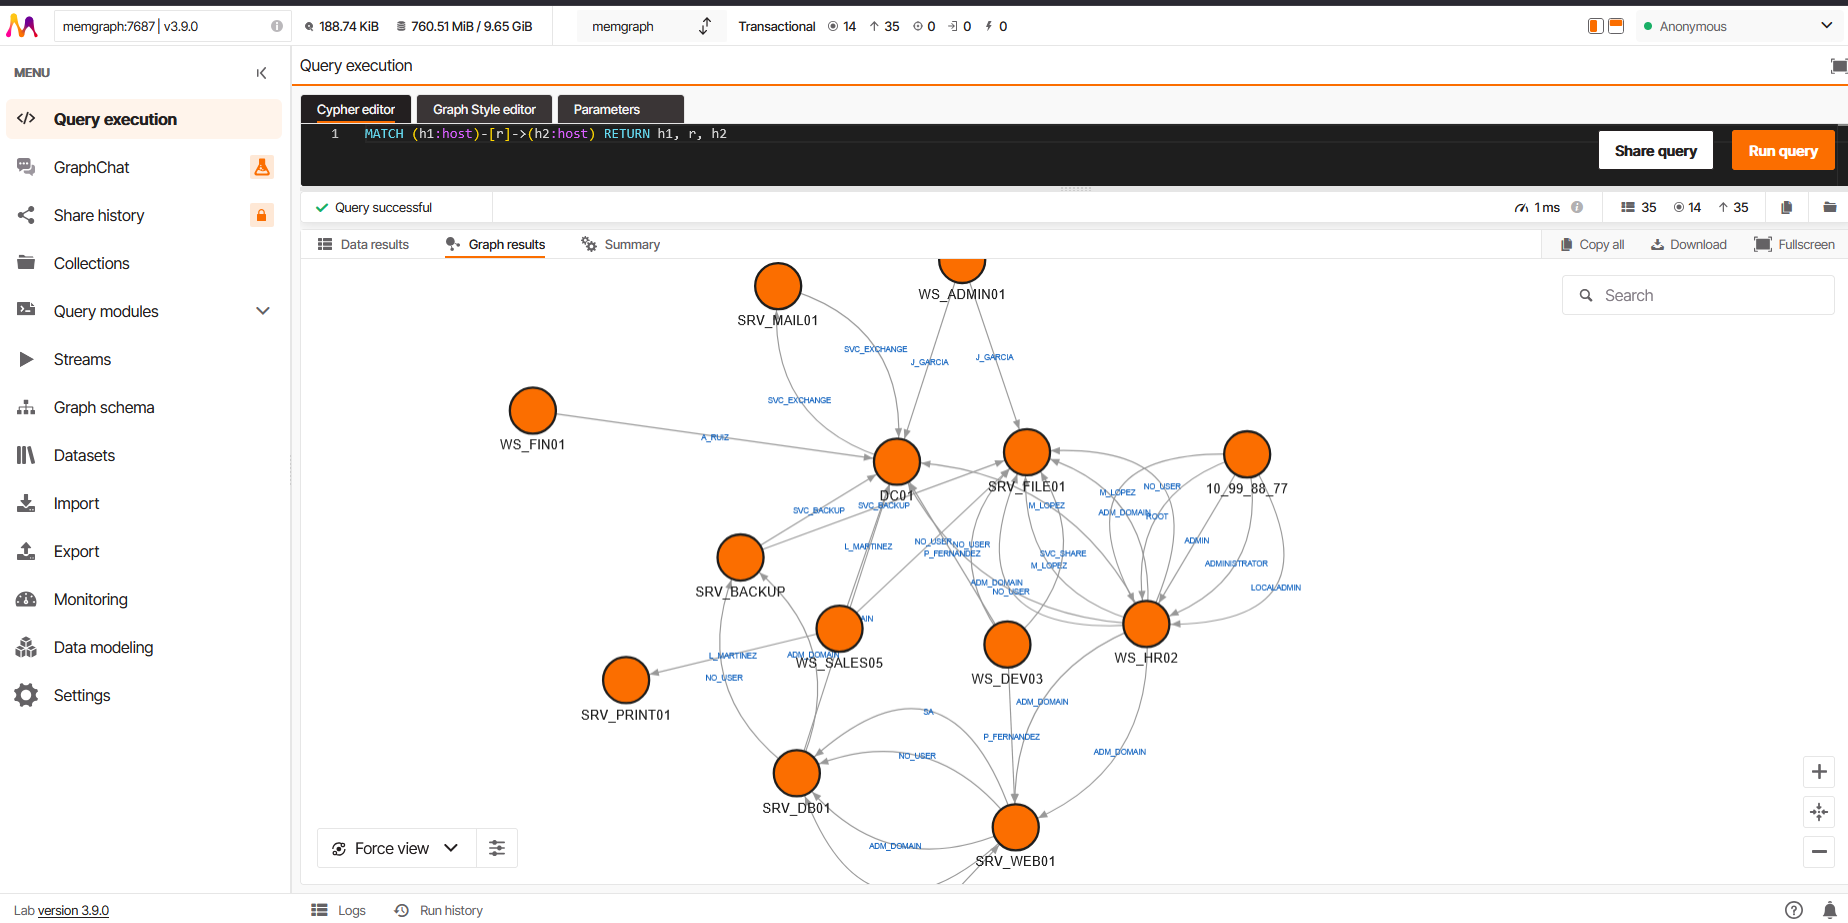
View all lateral movement
MATCH (h1:host)-[r]->(h2:host)
RETURN h1, r, h2
Filter by time range
MATCH (h1:host)-[r]->(h2:host)
WHERE localDateTime(r.time) >= localDateTime("2026-03-12T00:00:00")
  AND localDateTime(r.time) <= localDateTime("2026-03-13T00:00:00")
RETURN h1, r, h2
ORDER BY localDateTime(r.time)
Exclude machine accounts and unresolved users
MATCH (h1:host)-[r]->(h2:host)
WHERE localDateTime(r.time) >= localDateTime("2026-03-12T00:00:00")
  AND localDateTime(r.time) <= localDateTime("2026-03-13T00:00:00")
  AND NOT r.target_user_name ENDS WITH '$'
  AND NOT r.target_user_name = 'NO_USER'
RETURN h1, r, h2
ORDER BY localDateTime(r.time)
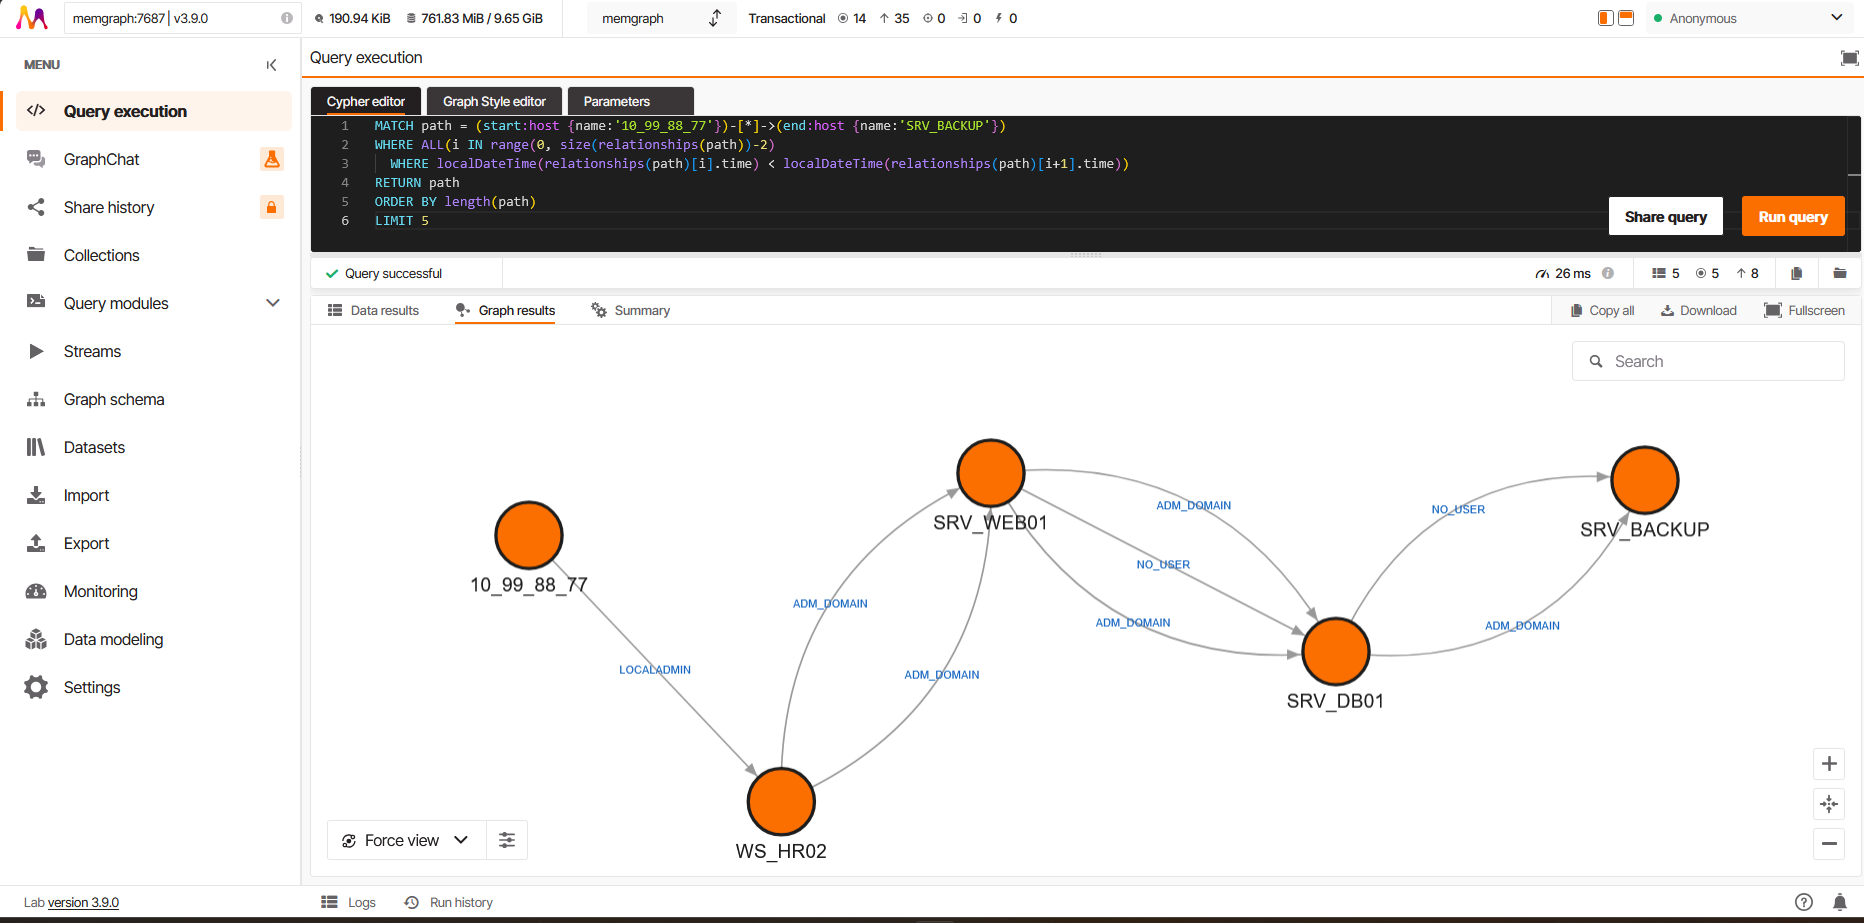
Temporal path between two hosts
The temporal path query works the same way — the ALL() + range() logic is compatible:
MATCH path = (start:host {name:'10_99_88_77'})-[*]->(end:host {name:'SRV_BACKUP'})
WHERE ALL(i IN range(0, size(relationships(path))-2)
  WHERE localDateTime(relationships(path)[i].time) < localDateTime(relationships(path)[i+1].time))
RETURN path
ORDER BY length(path)
LIMIT 5
For the full query catalog (filtering by logon type, service accounts, specific users, most connected nodes), see the Neo4j and Cypher article. All of them work in Memgraph by replacing datetime() with localDateTime().
Graph style
By default, Memgraph Lab shows all text in the same color, making it hard to distinguish machine names (nodes) from user names (edges). The masstin repository includes a custom GSS style at memgraph-resources/style.gss that fixes this:
- Node labels (machine names): black, larger font
- Edge labels (user names): blue, smaller font
To apply it:
- Open the Graph Style editor tab in Memgraph Lab (next to Cypher editor)
- Select all the existing content (Ctrl+A)
- Paste the contents of
style.gss - Click Apply
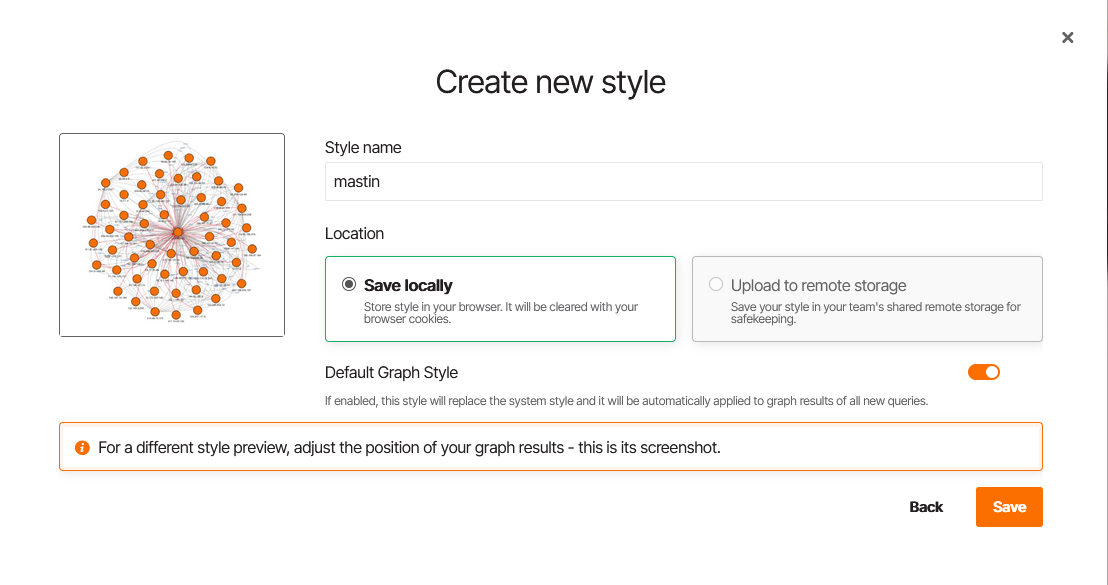
To save it permanently and make it the default for all future queries:
- Click Save style
- Enter the name
masstin - Select Save locally
- Enable Default Graph Style — this will automatically apply the style to all new query results
When to use Memgraph vs Neo4j
| Memgraph | Neo4j | |
|---|---|---|
| Speed | Faster (in-memory) | Slower (disk-based) |
| Resources | Lightweight, no JVM | Requires JVM, more RAM |
| Deployment | One Docker command | More configuration |
| Persistence | Volatile by default | Persistent |
| License | Open source | Community / Enterprise |
For quick analysis during an incident, Memgraph is the most practical option. If you need a persistent environment for extended investigations, Neo4j may be more suitable.
Post-load: merge two nodes that are the same physical host
Sometimes the loader cannot tie an IP-shaped node to its hostname-shaped twin — typically because there were no 4778 or 4779 Security events in the dataset to act as authoritative evidence. masstin ships with a merge-memgraph-nodes action that fuses both nodes into one, transferring every relationship from the old node to the new one, preserving relationship type and properties, and then deleting the orphan node. It does not require the MAGE module.
masstin -a merge-memgraph-nodes \
        --database localhost:7687 \
        --old-node "10.0.0.10" --new-node "WORKSTATION-A"
Internally, masstin introspects the relationship types touching the old node and runs one transfer query per type — because vanilla Cypher does not allow dynamic relationship types in CREATE, and masstin produces one type per target_user_name. If you prefer to run the Cypher manually for a single type :RELTYPE, the pattern is:
// Outgoing edges of one specific type
MATCH (new:host {name:'WORKSTATION-A'})
WITH new
MATCH (old:host {name:'10.0.0.10'})-[r:RELTYPE]->(target)
CREATE (new)-[nr:RELTYPE]->(target)
SET nr = properties(r)
DELETE r;

// Incoming edges of the same type
MATCH (new:host {name:'WORKSTATION-A'})
WITH new
MATCH (source)-[r:RELTYPE]->(old:host {name:'10.0.0.10'})
CREATE (source)-[nr:RELTYPE]->(new)
SET nr = properties(r)
DELETE r;

// Delete the orphan node once all of its edges are gone
MATCH (old:host {name:'10.0.0.10'}) DELETE old;
If you have the MAGE merge module installed, CALL merge.nodes([new, old]) YIELD merged does the same thing in one statement. The masstin action covers the case where MAGE is not available.
$ comments