This is Part 2 of the AD DFIR Lab series. We create all lab VMs with fully unattended installation.
The challenge
We need to install 9 virtual machines:
- 6 Windows (3x Server 2019, 2x Server 2016, 1x Windows 10)
- 1 Ubuntu 22.04
- 1 Kali Linux
- 1 pfSense (covered in Part 3)
Doing it manually via VNC would take hours of clicking. The whole point is to automate everything.
Creating VMs with qm
Each VM is created with qm create defining the virtual hardware. For Windows:
qm create 101 \
    --name DC01-kingslanding \
    --ostype win10 \
    --machine q35 \
    --cpu host \
    --cores 2 \
    --memory 4096 \
    --scsihw virtio-scsi-single \
    --scsi0 local-zfs:50,iothread=1,discard=on,ssd=1 \
    --ide2 local:iso/windows-server-2019.iso,media=cdrom \
    --ide0 local:iso/virtio-win.iso,media=cdrom \
    --ide3 local:iso/autounattend-2019.iso,media=cdrom \
    --net0 virtio,bridge=vmbr0,tag=10 \
    --boot order=ide2\;scsi0 \
    --agent enabled=1
Key points:
virtio-scsi-singlewithiothread=1: maximum disk performance, one I/O thread per diskdiscard=on,ssd=1: TRIM so ZFS reclaims unused space- 3 CD-ROMs: Windows ISO on
ide2, VirtIO drivers onide0, autounattend onide3 tag=10: VLAN 10 (corporate network)agent enabled=1: enables QEMU guest agent communication
Full VM table
| VMID | Name | OS | RAM | Disk | VLAN |
|---|---|---|---|---|---|
| 100 | pfsense | FreeBSD | 1 GB | 8 GB | 10+20 |
| 101 | DC01-kingslanding | Win 2019 | 4 GB | 50 GB | 10 |
| 102 | DC02-winterfell | Win 2019 | 4 GB | 50 GB | 10 |
| 103 | SRV02-castelblack | Win 2019 | 4 GB | 50 GB | 10 |
| 104 | DC03-meereen | Win 2016 | 4 GB | 50 GB | 10 |
| 105 | SRV03-braavos | Win 2016 | 4 GB | 50 GB | 10 |
| 106 | WS01-highgarden | Win 10 | 4 GB | 50 GB | 10 |
| 107 | LNX01-oldtown | Ubuntu 22.04 | 2 GB | 20 GB | 10 |
| 108 | KALI-nightking | Kali Linux | 4 GB | 30 GB | 20 |
Total: 35 GB RAM and ~358 GB disk on ZFS with thin provisioning.
Windows: autounattend.xml
Windows Setup automatically searches for an autounattend.xml file on CD-ROM drives at boot. If found, it runs the installation without human intervention.
VirtIO drivers
Windows doesn’t include VirtIO drivers out of the box. Without them, the installer can’t see the virtual SCSI disk. The trick: load drivers from the VirtIO ISO in the windowsPE pass:
<component name="Microsoft-Windows-PnpCustomizationsWinPE" ...>
  <DriverPaths>
    <PathAndCredentials wcm:action="add" wcm:keyValue="1">
      <Path>D:\vioscsi\2k19\amd64</Path>
    </PathAndCredentials>
    <PathAndCredentials wcm:action="add" wcm:keyValue="2">
      <Path>D:\NetKVM\2k19\amd64</Path>
    </PathAndCredentials>
    <!-- Repeat for E: and F: since drive letter varies -->
  </DriverPaths>
</component>
Edition selection by INDEX
Evaluation ISOs contain multiple editions. A common mistake is selecting by name — but names vary between versions. Much more reliable: select by INDEX:
<InstallFrom>
  <MetaData wcm:action="add">
    <Key>/IMAGE/INDEX</Key>
    <Value>2</Value>  <!-- Standard with Desktop Experience -->
  </MetaData>
</InstallFrom>
Use wiminfo from Linux to check which index maps to which edition:
apt-get install -y wimtools
mount -o loop windows-server-2019.iso /mnt/iso
wiminfo /mnt/iso/sources/install.wim
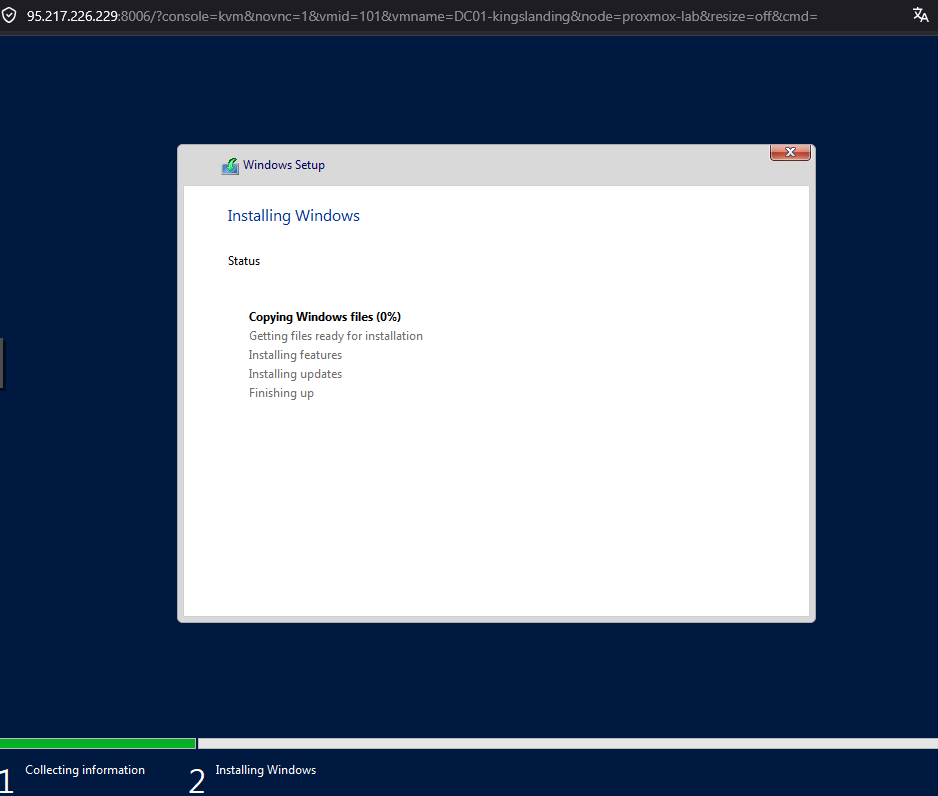
After a few minutes, the installer boots and starts copying files without intervention:
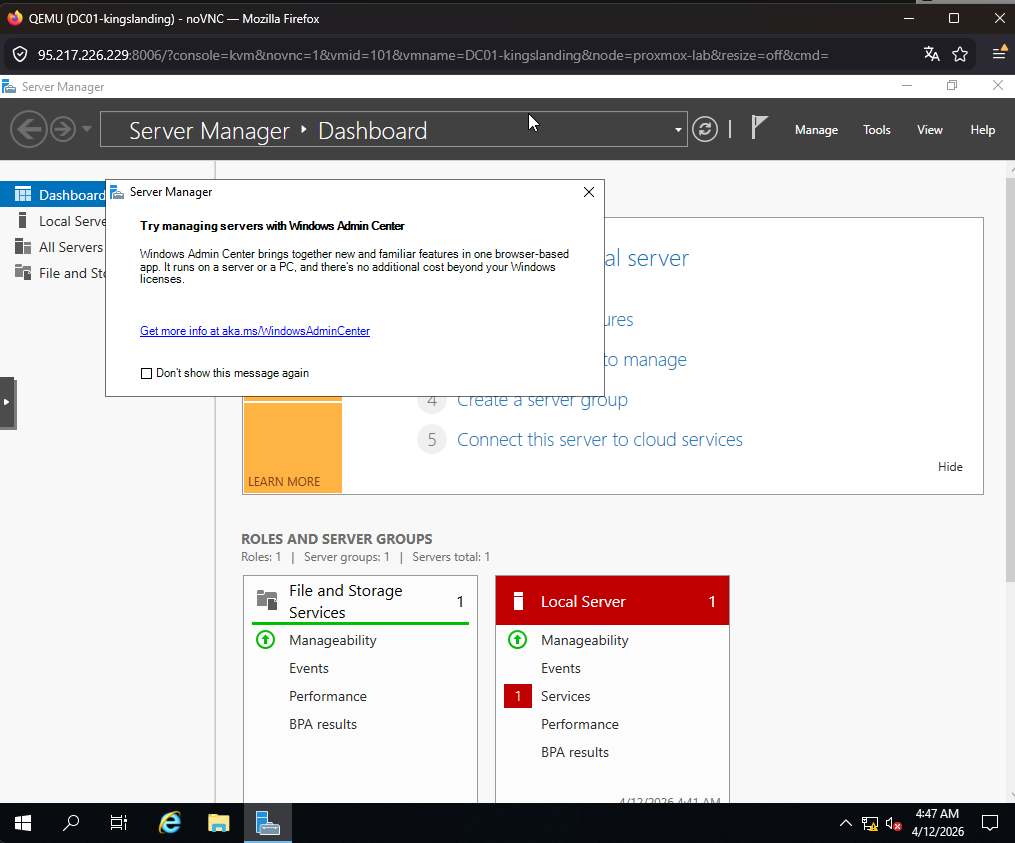
And ~15 minutes later, the VM shows up with the desktop ready, Server Manager open, and firewall disabled:
No product key needed
Evaluation ISOs don’t need a product key. If you include a KMS retail key, the installer shows “No images are available”. Simply omit the ProductKey block.
Post-install automation
In FirstLogonCommands we configure everything needed after installation:
- Permanently disable firewall with
Set-NetFirewallProfile - Enable WinRM for remote management
- Install QEMU Guest Agent from the VirtIO ISO
- Install VirtIO balloon driver
The guest agent enables Proxmox to communicate with the VM: execute commands, get IPs, clean shutdown.
Ubuntu: Cloud Image + Cloud-Init
Automating the Ubuntu server ISO with autoinstall is fragile — there are confirmation prompts that break automation. The cleaner solution: use the cloud image with Proxmox cloud-init:
# Download cloud image (700 MB vs 2 GB ISO)
wget -O jammy-server-cloudimg-amd64.img \
    "https://cloud-images.ubuntu.com/jammy/current/jammy-server-cloudimg-amd64.img"

# Import as VM disk
qm importdisk 107 jammy-server-cloudimg-amd64.img local-zfs
qm set 107 --scsi0 local-zfs:vm-107-disk-0,iothread=1,discard=on,ssd=1
qm resize 107 scsi0 20G

# Configure cloud-init
qm set 107 --ide2 local-zfs:cloudinit
qm set 107 --ciuser ubuntu --cipassword ubuntu
qm set 107 --ipconfig0 ip=dhcp
qm set 107 --boot order=scsi0
The VM boots in ~30 seconds with SSH enabled. No ISO, no installer, no prompts.
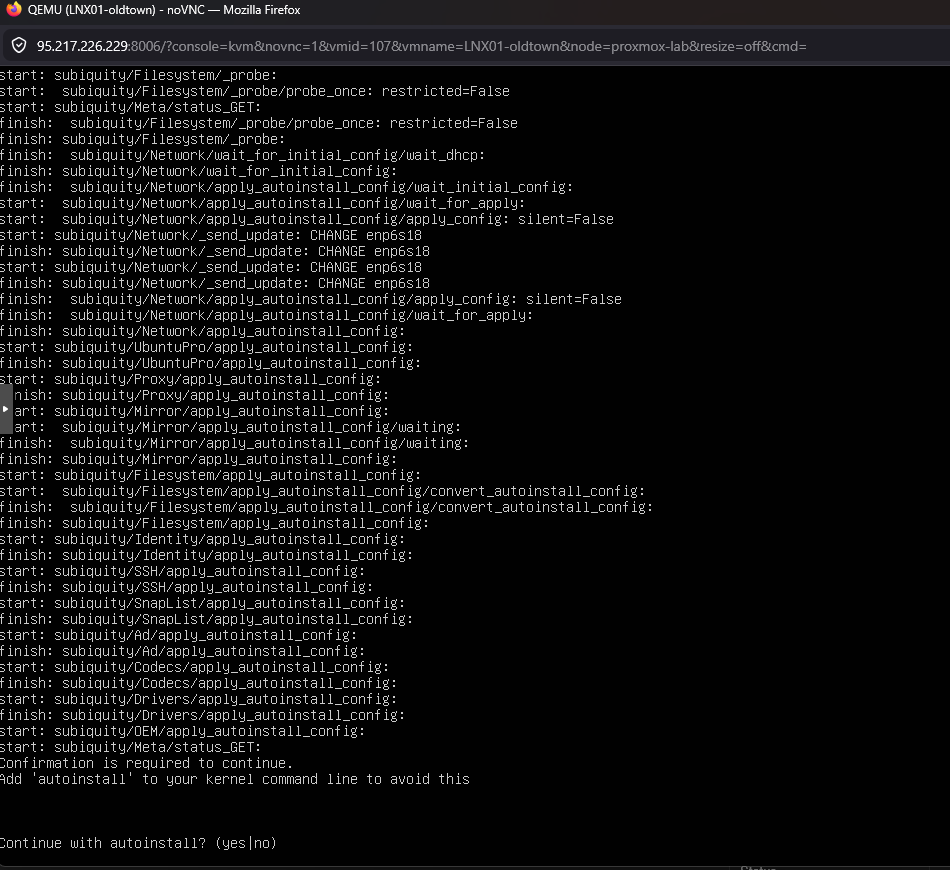
The Ubuntu server ISO, on the other hand, requires confirming autoinstall with a manual prompt even with a seed configured:
That’s why we ditch the ISO and use the cloud image directly.
Gotcha: the Ubuntu cloud image is minimal and does not include qemu-guest-agent. Proxmox cloud-init doesn’t install packages either — it only configures users, network and SSH. After first boot you need to SSH in and install it:
ssh ubuntu@VM_IP 'sudo apt install -y qemu-guest-agent && sudo systemctl enable --now qemu-guest-agent'
Kali: Preseed injected into the initrd
Kali was the most complex to automate. Three problems:
- The official ISO uses
simple-cddwith profiles that override any external preseed - The preseed must be available before the installer asks for language — mounting it as a CD isn’t early enough
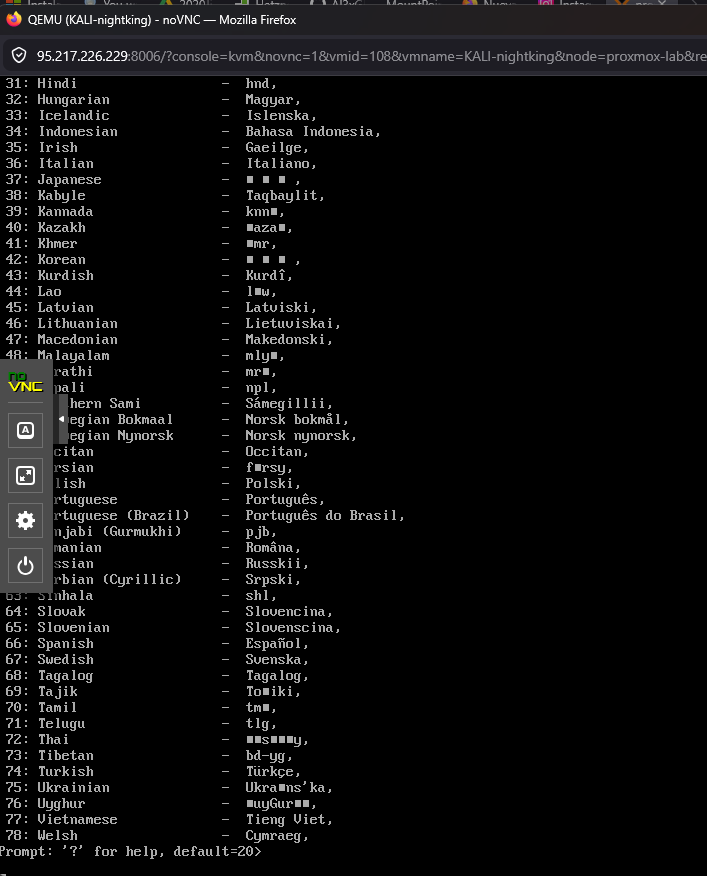
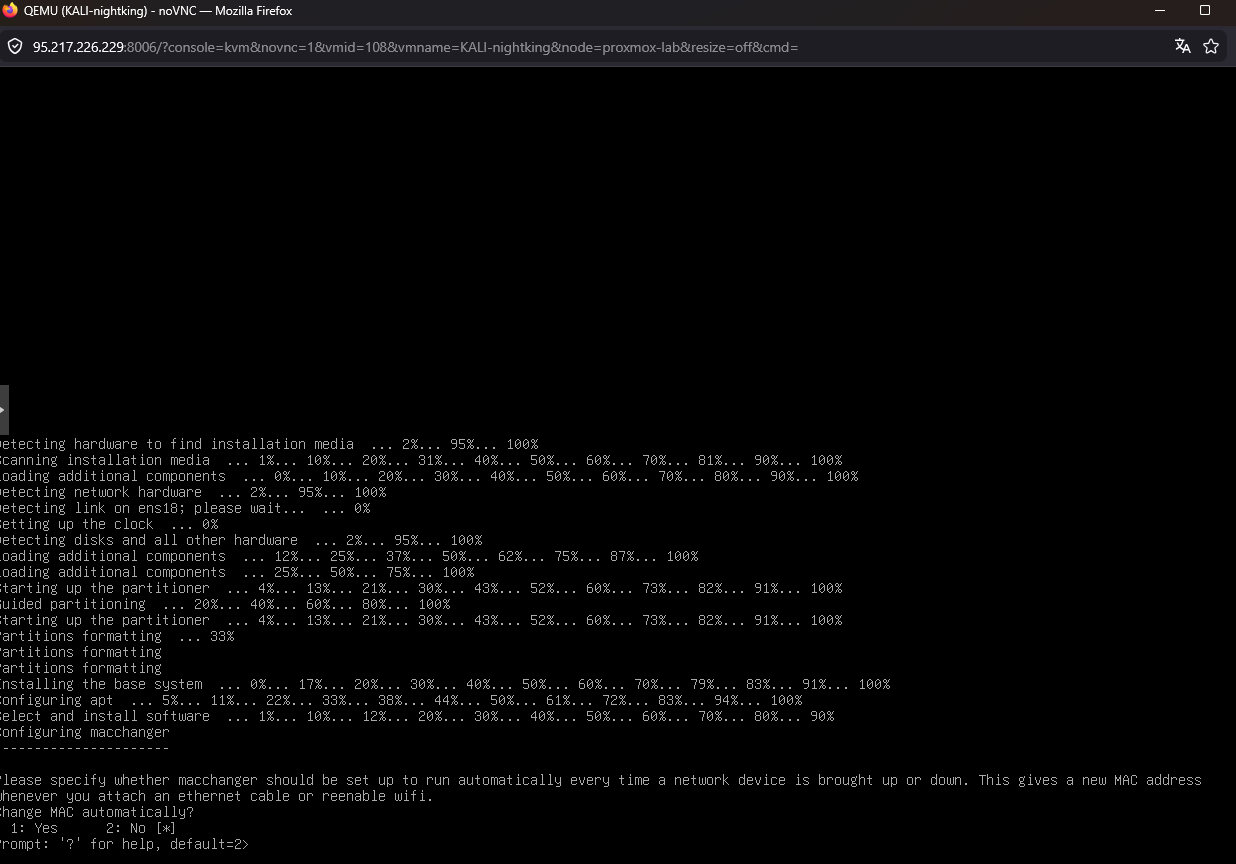
kali-linux-defaultpackages ask debconf questions (macchanger, kismet, wireshark, sslh):
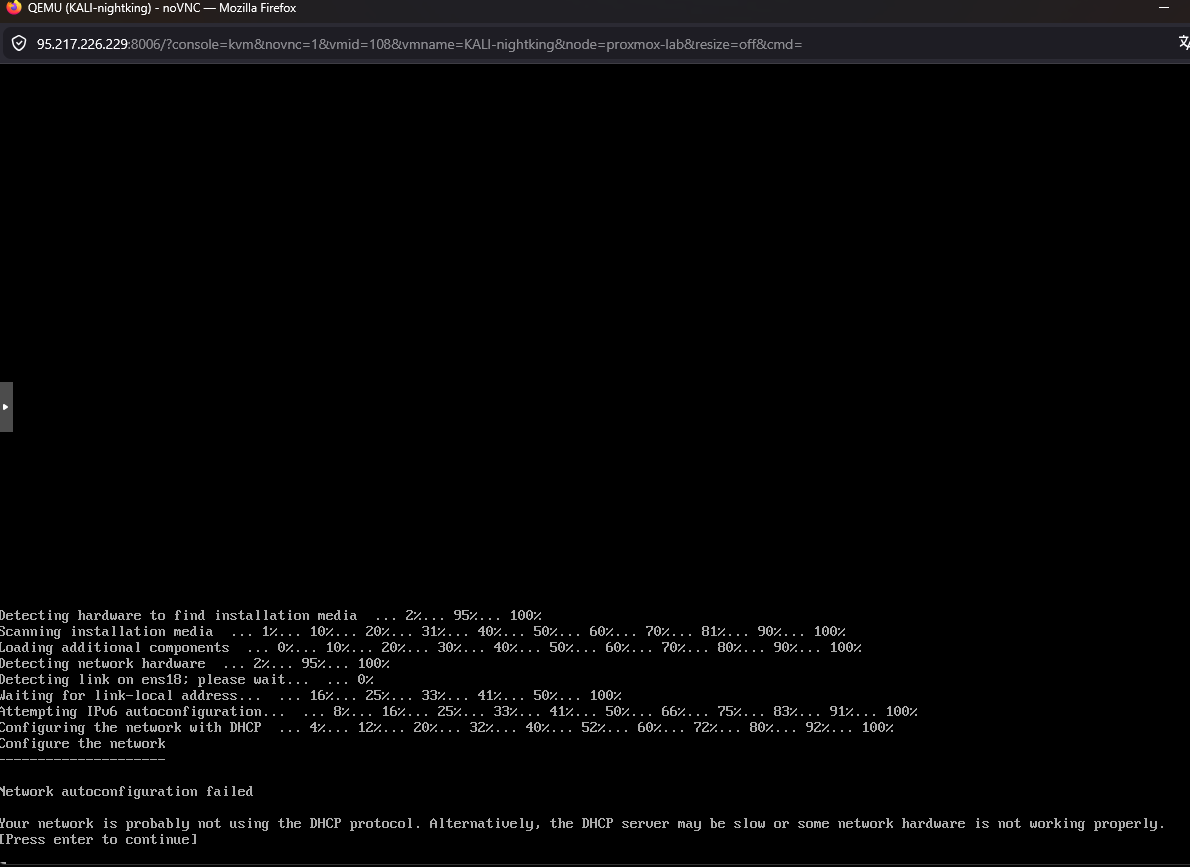
And as a bonus, without DHCP on VLAN 20, the installer fails at network configuration:
The solution: inject preseed into the initrd
# Extract ISO
xorriso -osirrox on -indev kali.iso -extract / /tmp/kali-iso

# Inject preseed into initrd
mkdir /tmp/initrd-work && cd /tmp/initrd-work
gzip -d < /tmp/kali-iso/install.amd/initrd.gz | cpio -id
cp preseed-kali.cfg preseed.cfg
find . | cpio -H newc -o | gzip > /tmp/kali-iso/install.amd/initrd.gz

# Patch GRUB — remove simple-cdd
sed -i 's|preseed/file=/cdrom/simple-cdd/default.preseed simple-cdd/profiles=kali,offline desktop=xfce|auto=true priority=critical preseed/file=/preseed.cfg locale=en_US.UTF-8 keymap=us|g' \
    /tmp/kali-iso/boot/grub/grub.cfg

# Repack ISO
xorriso -as mkisofs ... -o kali-preseed.iso /tmp/kali-iso
Static IP and debconf answers
Without pfSense/DHCP on the network, we need a static IP. And Kali packages ask questions that need pre-answering:
d-i netcfg/disable_autoconfig boolean true
d-i netcfg/get_ipaddress string 192.168.20.100
d-i netcfg/get_gateway string 192.168.20.1

macchanger macchanger/automatically_run boolean false
kismet-capture-common kismet-capture-common/install-setuid boolean true
wireshark-common wireshark-common/install-setuid boolean true
sslh sslh/inetd_or_standalone select standalone
Gotcha: install loop
After Kali finishes installing and reboots, it boots from the CD-ROM again and re-runs the installer. It asks whether to wipe the existing LVM. The problem is the VM’s boot order — it prioritizes IDE over SCSI.
Fix: after the first complete install, remove the ISO and change boot order:
qm set 108 --delete ide2
qm set 108 --boot order=scsi0
qm reboot 108
QEMU Guest Agent: the last hurdle (and why it needs manual intervention)
The guest agent lets Proxmox communicate with VMs — get IPs, execute commands, clean shutdown. Sounds simple: install an MSI and done. It’s not. In fact, this is the only part of the lab that CANNOT be fully automated.
The MSI is not enough
The qemu-ga-x86_64.msi on the VirtIO ISO only installs the guest agent service. It does NOT install the virtio-serial driver — the communication channel with Proxmox. Without that driver, the service starts but can’t talk to the host. Proxmox reports QEMU guest agent is not running even though inside Windows the service is Running.
The apparent fix: install virtio-win-guest-tools.exe — the all-in-one installer that includes ALL VirtIO drivers (vioserial, balloon, etc.) plus the guest agent. But here comes the problem.
Every automation attempt we tried — and why they failed
We tried every way to install the driver remotely:
pnputil /add-driver vioser.inf /install— “Invalid INF passed as parameter”. Backslash paths break through WinRM- Copy drivers from CD to local disk (
robocopy,xcopy) — WinRM sessions cannot read from CD-ROM drives, copy returns 0 files - Download
virtio-win-guest-tools.exevia HTTP and run via WinRM — installer returns exit 0, service is running, but the vioserial driver does not bind to the hardware - Scheduled task as SYSTEM — same result, “successful” install but driver not loaded
- Reinstall the MSI with
ADDLOCAL=ALL— doesn’t install the vioserial driver either
In every case, PowerShell reports:
Status  FriendlyName
------  ------------
Error   PCI Simple Communications Controller   (VEN_1AF4&DEV_1003)
The VirtIO Serial device stays in Status: Error — no driver bound.
The only solution: manual install via VNC
After multiple attempts, the conclusion: the VirtIO installer requires an interactive session to bind kernel-mode drivers to hardware. There is no automated workaround.
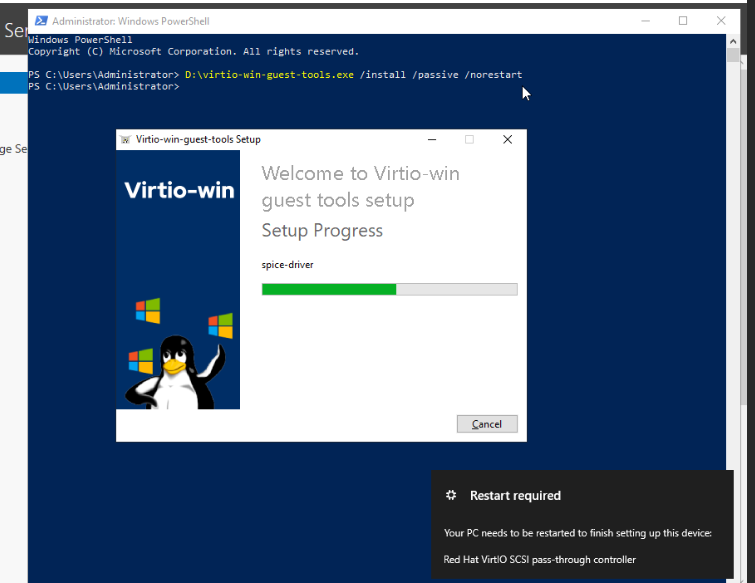
Manual procedure per VM:
- Open VNC console in Proxmox web UI
- Login as
vagrant/vagrant - Open PowerShell as administrator
- Run:
D:\virtio-win-guest-tools.exe - Click through the wizard: Next → Install → Finish
Restart-Computer -Force
After reboot, the vioserial driver loads and the guest agent connects to Proxmox.
Total time: ~1 minute per VM × 6 Windows VMs = 6 minutes of manual work. This is the only non-automatable step of the lab, but after this, everything else can be done via the guest agent.
Watch out for VLANs and Hetzner
A mistake that nearly cost us the server: during provisioning, we temporarily placed VMs on the bridge without a VLAN tag so they could get DHCP. The virtual MAC addresses leaked to Hetzner’s physical network.
Result: an abuse email from Hetzner threatening to lock the server.
Golden rule: never remove VLAN tags from VMs on a Hetzner dedicated server. Instead, use VLAN interfaces on the host:
# Create VLAN interfaces on Proxmox
ip link add link vmbr0 name vmbr0.10 type vlan id 10
ip addr add 192.168.10.1/24 dev vmbr0.10

# CRITICAL: add VLANs to bridge self-port
bridge vlan add dev vmbr0 vid 10 self
bridge vlan add dev vmbr0 vid 20 self
Without bridge vlan add dev vmbr0 vid 10 self, the host cannot communicate with VMs on VLAN 10 even if the vmbr0.10 interface exists.
Result
After ~20 minutes of unattended installation: 8 VMs installed without touching a single prompt:
- Windows: with guest agent, WinRM, RDP, firewall disabled,
vagrant/vagrantcredentials - Ubuntu: with SSH, cloud-init,
ubuntu/ubuntu - Kali: with
kali-linux-default, SSH,kali/kali
All code at: 04-create-vms.sh and autounattend/
Post-install configuration via guest agent
Once the guest agent is running on all 8 VMs (the 6 Windows + Ubuntu + Kali), the rest of the configuration is trivial. Forget WinRM, forget manual SSH — qm guest exec from Proxmox is more reliable than any alternative:
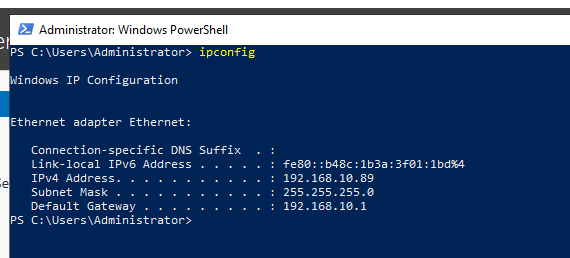
# Set static IP + hostname on DC01 from Proxmox
qm guest exec 101 -- powershell -Command '
    $a = Get-NetAdapter | Where { $_.Status -eq "Up" } | Select -First 1
    New-NetIPAddress -InterfaceIndex $a.ifIndex `
        -IPAddress 192.168.10.10 -PrefixLength 24 `
        -DefaultGateway 192.168.10.1
    Set-DnsClientServerAddress -InterfaceIndex $a.ifIndex `
        -ServerAddresses 192.168.10.10
    Rename-Computer -NewName kingslanding -Force
'
Quick verification from inside the VM via VNC:
After applying the config to all 6 Windows VMs, reboot via guest exec:
qm guest exec 101 -- cmd /c "shutdown /r /t 5 /f"
Finally, cleanup: remove installation ISOs and set boot order:
for VMID in 101 102 103 104 105 106; do
    qm set $VMID --delete ide2  # Windows ISO
    qm set $VMID --delete ide0  # VirtIO ISO
    qm set $VMID --delete ide3  # autounattend ISO
    qm set $VMID --boot order=scsi0
done
Final state
After Phase 5, the lab looks like this:
| VMID | Hostname | IP | Role |
|---|---|---|---|
| 101 | kingslanding | 192.168.10.10 | Root DC, sevenkingdoms.local |
| 102 | winterfell | 192.168.10.11 | Child DC, north.sevenkingdoms.local |
| 103 | castelblack | 192.168.10.12 | IIS + MSSQL + shares |
| 104 | meereen | 192.168.10.13 | Root DC, essos.local |
| 105 | braavos | 192.168.10.14 | Cross-forest server |
| 106 | highgarden | 192.168.10.20 | Win10 workstation |
| 107 | oldtown | DHCP | Ubuntu (Linux client) |
| 108 | nightking | 192.168.20.100 | Kali (attacker) |
8 machines configured, hostnames matching the Game of Thrones theme, static IPs in VLAN 10 (corporate) and Kali isolated in VLAN 20.
Ready for the next step: configuring pfSense as a router between the two VLANs, then deploying Active Directory with GOAD.
Next: Part 3 — Beyond the Wall: pfSense, VLANs and Network Segmentation
Previous: Part 1 — From Bare Metal to Proxmox
$ comments